PhotobucketPhotobucketPhotobucketPhotobucketPhotobucket

780x90

Hello! If you're new to Miss Lovie, I'd love for you to subscribe for free updates! You can subscribe by RSS feed or by email! Also be sure to follow on Facebook and Twitter for more Miss Lovie goodness!

Monday, December 31, 2012

Top 10 Miss Lovie Projects of 2012- My Favorites

Happy New Year!!
It's hard to believe this year is already over. It's been a great year for me personally and for Miss Lovie, I think. In my personal life, I have graduated from grad school (finally, yay!!), I got engaged (!!), I traveled to new places, sewed more and have made lots of jewelry, Mr. Lovie and I have been doing so great, and I have had a great school year with my kindergarteners so far. I'm so looking forward to 2013, though. Let the wedding planning (and honeymoon planning!!) begin.

And even though I haven't been able to post on my blog as much as I want (so MANY of my ideas never come to be because of time issues), I think the content that did make it to my blog has been my best. Looking back over the posts from this year made me happy. It's been a fun (and challenging!) year with jewelry-making, I've met new sewing goals, and I've even tackled a few DIY projects that I've been wanting to do for years (my reading chair). I hope you enjoy my personal list of favorites! 

In no particular order...
Halloween is my absolute favorite and making these costumes was important to me. I just love how they turned out. That skirt is so sparkly and fluffy I can't stand it. And that Collar Statement Necklace was surprisingly good for everyday wear, too! 

I am planning on wearing this necklace tonight probably for New Year's festivities! It's the perfect fancy necklace that you can dress up or down!

Even with it's minor imperfections, I really love this blanket. It is the first blanket I've ever sewed and I'm really proud of the outcome. 

By using some basic classroom supplies I created this bright and happy new school year wreath. It made my classroom door welcoming and uplifting, and the kids loved it. 

I'm not a huge fan of the ombre trend, so when that was the theme for one week during the So You Think You're Crafty contest I was in, I knew I had to create something that fit the theme, but would actually be something I loved. The colors in this are so fun. It was perfect for the summer. 

Every year at my school, each class in the primary grades decorates their classroom door for Read Across America Day (Dr. Seuss's birthday) and the older kids vote on which one is best. I am proud to say ours won this year! The kids loved making the truffula trees and they never wanted to take the door decoration down. 

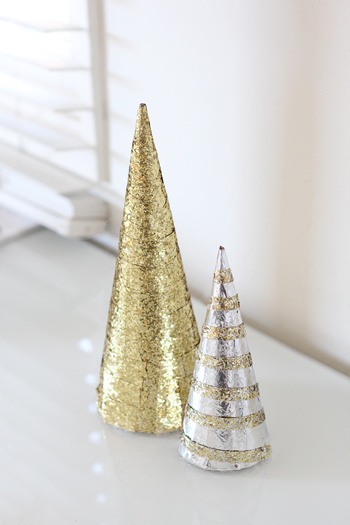
Can I just be here right now instead of in the snow?! This really is such an easy project and is one of my absolute favorites.

This was the most intricate and difficult jewelry project I've ever made. It took me a couple weeks to complete (several hours a night), but it was so worth it. I love this necklace with a wedding dress or even just with a tshirt and skinny jeans. 

This chair had been in my family forever and I've used it in my classroom every year that I've taught, but this past summer I decided it was time for a makeover. I love the new bright white color, and the new cushion and pillows. It's prettier and comfier! You've got to go check out the before and after.

This is the perfect activity for any child during road trips or just on the living room floor. I have used this in my classroom in a retelling center where kids retell familiar stories. They love the soft felt pieces, the bright colors, and that they can carry it anywhere in the room.

And even though I said this was the top 10, I had include this light wreath. I just love those lights. 

Happy New Year! 
Be safe this evening and I'll see ya in 2013! Thanks for reading!
Photobucket

Sunday, December 30, 2012

Faux Chenille Baby Blanket

Hello! I hope you've been having a relaxing holiday! I've been home visiting my family so I've been laying low. I'll have more fun ideas up for you soon! 

I'm pretty proud of this little blanket. I've never made a blanket or quilt before now and I've been feeling quite accomplished. Ha. It is NOWHERE close to perfect, but that's okay. It was a great learning experience and I'll know what to do better next time. Any mistakes are not too noticeable to an untrained eye anyway and I'm sure Matt's 15 month old niece won't care a bit. 
I cannot claim the genius behind this gorgeous faux chenille idea. The tutorial I followed is on Aesthetic Nest, here, and I also read Dana's tutorial for additional tips on Made, here. If you've never seen any of these faux chenille blankets before, you've got to go read the tutorials. It really is amazing how they're made and the result is just so beautiful. Basically you stack several layers of fabric, sew. then cut all the layers except the bottom layer. When you put it in the washer and dryer, the cut fabric frays up and creates the wavy fluffy appearance you see. Crazy and awesome. 
 Aren't those waves of chenille just beautiful?! I'm not going to lie to you and say it was super easy or fast, because it wasn't. And, of course, I made changes to the tutorial to make it more difficult on myself. I always do that. 
However, if you are wanting to make a beautiful blanket for a loved one, this one really is a show stopper. 
Just in case you want to make one, here's what I did that was different from the tutorial I used:
Materials:
Annette Tatum Bohemian Ikat Diamond Pink Fabric (front of blanket)
High Loft Batting (crib size) (the kind of batting used for a fluffy blanket appearance)*
White fabric with a little print
4 various coordinating colors of cotton flannel
1/2 inch satin binding (made by me from 2 inch satin binding-directions on how here)

*In hind sight, this may not be the best kind to use. :)

And this awesome tool, the Olfa Chenille Cutter, was a lifesaver. Seriously. Cutting all those layers takes time and concentrated effort and lots of time. In my experience, it was well worth having one.

Process:
So when I made my sample square, the backing fabric that I did not cut (the printed fabric) seemed thinner and floppier than I had anticipated. I'm sure it would have been fine, but I wanted it to be a little thicker so I decided to add in some layers of flannel so the chenille would be even fluffier, and to also make that back layer thicker. My plan worked except it was much more difficult to sew. It was heavy and stiff, during the sewing process so it did not just glide through the machine-I did a lot of tugging and pulling and moving the fabric around. The end product was great, but getting there was tough. I think a thinner batting would do the trick just fine and it may make it a little easier to sew. 

So instead of layering just 1 layer of back printed fabric, I stacked that fabric (printed side down) first, then the layer of batting, then the all white fabric (it had a little print on it which helped in the cutting process since I could easily tell which layers to cut) then the 4 layers of cotton flannel on top. I safety pinned all layers and sewed as directed in the tutorial. When cutting I used the  Olfa Chenille Cutter to cut only the flannel layers (as directed in the tutorial) so the back layer was actually 3 layers (the printed fabric, the batting, and the white fabric). 

If you make one and add in all these layers, know that it will feel crazy stiff when you sew it, but it will fluff up and be really nice when you cut it up and wash and dry it. 

When binding, I followed the directions on the tutorial, but it was very difficult to fit all those layers into 1/2 inch binding even with LOTS of pinning. I did it, but I can't say it was the prettiest result. A wider binding would have been just as pretty and easier to sew.

Obviously this is not a complete tutorial. You'll need to read this tutorial to see a complete guide. The only thing I did different really was add the layers! 

Just thought I'd share my findings and tips! I hope they help if you make one, too!
I used some of the extra binding as a ribbon to tie around it. You don't even need a gift bag! 
I'd love to see yours if you make one or hear how it went if you add the layers like I did!
Thanks for reading! 
Photobucket

Saturday, December 22, 2012

Merry Christmas! And an Announcement!

Merry Christmas from the (soon to be) Walkers.
Yep. Mr. Lovie and I are engaged!
 I meant to take sweet pictures like this around October since that was when we actually got engaged and announce it then, but life happens. We've started wedding planning (if you follow me on Pinterest, I'm sure you've noticed) and then the Christmas madness began. That's also why I haven't been able to get as many posts up as I wanted. I hope you'll forgive me. :)
We've been together for 4 years and we're so excited to get married in October, 2013.
And I thought I should share with you, friends, too. :) 
What do you think about that light wreath? Want to make one? 
Great. Tutorial is coming soon!

Have a Merry Christmas! 

Thanks for reading!
Photobucket

Friday, December 21, 2012

Glitz and Gold Holiday Necklace

This lovely holiday tutorial, Glitz and Gold Holiday Necklace,  is up on 30 Handmade Days blog! Be sure to go check it out!
It's the perfect accessory for you holiday party dress or even with a plain tee and cardigan. Enjoy!

Linking to the parties on my sidebar and Liz Marie Blog


Photobucket

Saturday, December 1, 2012

My Favorite Things Thursday- It's Back!

I've really been missing showcasing the wonderful things I see around the blog world. I'm excited I had time to look around this week and find these wonderful ideas to fill your home with Christmas cheer!

Enjoy! 

Um. In love. Immediately. I love the drawstring bag, the colors, the simple design. All of it. Somebody get me some lumber.
I came across this sweet little tree and loved it right away. I have a ton of these that have been begging for a project. 
Glitter. Glitter. Glitter.
Yes. Yes. Yes.
And they're easy. 

How cool are these! I love the curled one.
Chalkboard art is so popular right now. I love how these ornaments look on this simple tree. I am also ridiculously jealous of Jenn's beautiful handwriting skills! Go check out her secret to great chalk board art.
I've been asked several times to share my bow tying tips by friends. I only knew about one of these secrets from this tutorial- so that means there are 3 more I need to try! I'm so excited. Tying the perfect bow is definitely an art. :)
I love this natural look. And I bet those real greens on there smell amazing. So sweet.
Gold and shiny+Christmas is always my favorite. 
LOOVING this idea. AND that stocking is so super cute.

Rudolph Silhouette Christmas Sign  by Melissa on Number 2 Pencil
I just love that sweet reindeer. And I really like the idea of creating art on wood slices! So cool. Apparently they sell them at Michael's. Who knew? Tutorial on Melissa's blog!
 Christmas Decor by Sarah at The Winthrop Chronicles
I'm a sucker for large color lights. They look so sweet against that wood pallet art.
 Felt Mistletoe by Aimee on It's Overflowing
I love all things felt. This is just the cutest. 

Have a great weekend, everyone!

Photobucket
Related Posts Plugin for WordPress, Blogger...

invisible ad